

Hey everyone, so today I wanted to share my little adventure with piping bags and star tips. I’ve always been fascinated by those beautifully decorated cupcakes and cakes you see in bakeries. You know, the ones with the perfect swirls and stars that look almost too good to eat? Well, I decided it was time for me to give it a shot.
First things first, I gathered all the stuff I needed. I already had some disposable piping bags lying around from a previous baking attempt. For the star tip, I picked up a small set of different tips from a local store – they were pretty cheap, less than a dollar each, I think. The set had a variety of shapes, but I was mostly interested in the star-shaped ones. I grabbed a simple Ateco brand one because I saw it mentioned online a lot.
Next, I whipped up a batch of buttercream frosting. I just used a basic recipe I found – you know, butter, powdered sugar, a bit of milk, and vanilla. Nothing fancy, but it gets the job done. I wanted to test out different consistencies, so I made one batch a bit stiffer and another a little softer.
Now came the fun part – filling the piping bag. Let me tell you, this can get messy! I tried a few different methods, but what worked best for me was placing the piping bag in a tall glass and folding the edges over the rim. This way, I could scoop the frosting in without making too much of a mess. I made sure not to overfill the bag – about two-thirds full seemed to be the sweet spot.
With the bag filled, I twisted the top to close it and pushed the frosting down towards the tip. I did a few test squeezes on a piece of parchment paper to get the hang of it. It definitely took some practice to get a consistent pressure and create even-looking stars. I played around with different angles and speeds to see what kind of effects I could achieve.
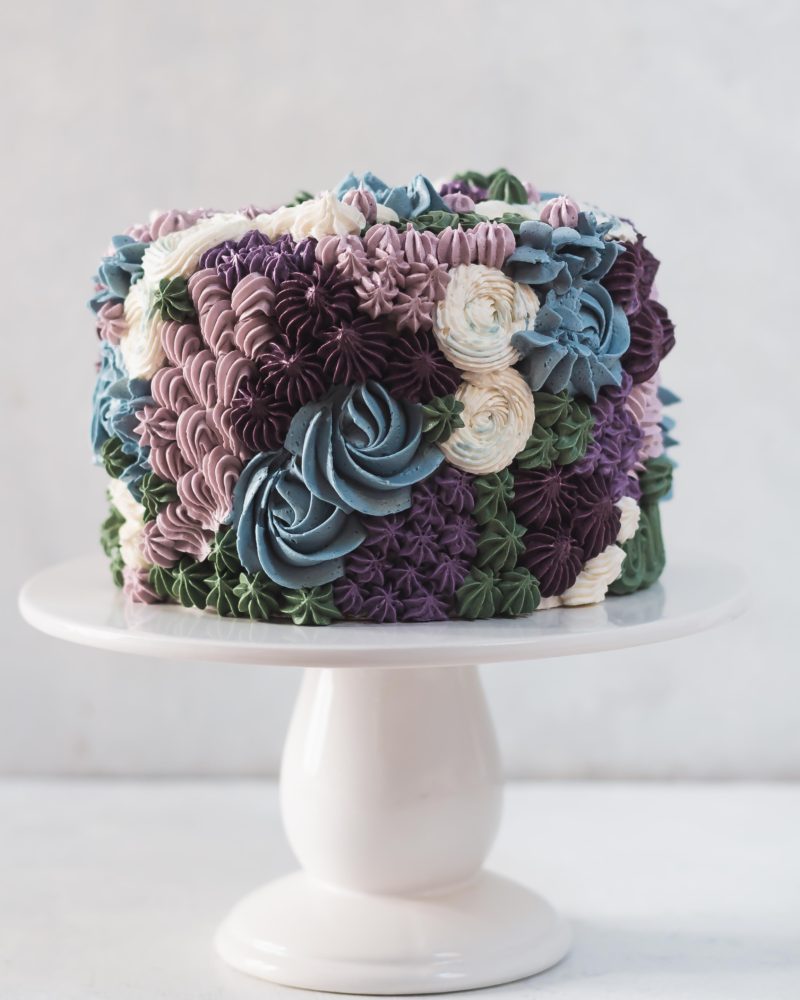
- Holding the bag straight up and squeezing gave me those classic star shapes.
- Tilting the bag at an angle created more elongated, swirly designs.
- Moving the bag in a circular motion while squeezing made pretty rosettes.
I tried out both the stiffer and softer frosting. The stiffer one held its shape better, creating more defined stars. The softer one was easier to squeeze but tended to lose its shape a bit. I guess it depends on the look you’re going for. Also, the stiffer frosting needed more muscle to squeeze it out of those tiny holes.
I spent a good hour just practicing different techniques and designs. It was actually pretty relaxing and therapeutic! By the end, I had a whole sheet of parchment paper covered in buttercream stars and swirls. It was messy, but I learned so much about how to use different tips, and how to move around the bag.
I wouldn’t say I’m a pro yet, but I definitely feel more confident about using piping bags and star tips now. I even decorated a batch of cupcakes for my friend’s birthday, and they turned out pretty decent! They tasted good, I think the frosting was the best part. I’ll have to try a 2D tip next time. It’s all about practice, right? Anyway, I just wanted to share my little baking experiment with you all. Maybe it’ll inspire you to give it a try too!


