
Hey everyone, it’s your buddy here, and I’ve got a fun little baking adventure to share with you all today. As some of you might know, I’ve been on a bit of a baking kick lately, trying out new recipes and tools. Well, this time, I stumbled upon something super cute that I just had to try – a Hello Kitty cake mold! Yep, you heard that right, a cake mold shaped like our favorite feline friend. I saw it online and thought, “Why not?” So, I ordered it, and let me tell you, it was quite the experience.
First off, when the package arrived, I was as excited as a kid on Christmas morning. I ripped open the box, and there it was, this adorable Hello Kitty mold. The instructions said it was made of silicone, which is supposed to be non-stick. Sounded easy enough, right? I decided to make a simple vanilla cake because, well, who doesn’t love vanilla cake?
Getting Started
So, I gathered all my ingredients – flour, sugar, eggs, the usual suspects. I started by mixing the wet ingredients. I creamed the butter and sugar together until it was all fluffy. I read somewhere online that mixing it really well helps make the cake light, so I went the extra mile with my mixer. Then, I added the eggs one at a time, followed by some vanilla extract. The smell was already amazing.
Next up were the dry ingredients. I combined the flour, baking powder, and a pinch of salt in a separate bowl. Then, slowly but surely, I started adding the dry mix to the wet mix. Now, this is where I messed up a bit the first time. You’re supposed to mix it gently, not to over mix, or the cake gets tough. My first attempt was a bit… dense. But hey, live and learn, right?
Baking Time
Once the batter was ready, it was time to use the mold. I poured the batter into the Hello Kitty mold, filling it up to about two-thirds full to give it room to rise. Popped it into the preheated oven, and waited. The waiting was the hardest part, especially with the delicious smell filling up my kitchen.
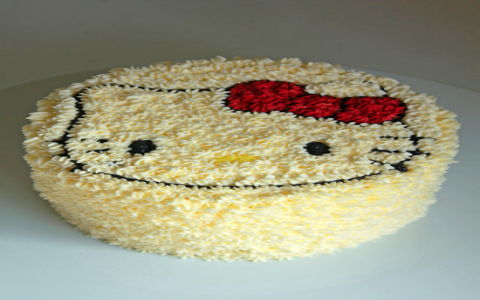
After about 30 minutes, I checked on the cake, and it looked golden and perfect. I did the toothpick test, and it came out clean. Success! I let the cake cool in the mold for a few minutes before trying to get it out. This is where the non-stick silicone was supposed to shine. And guess what? It did! The cake popped right out, perfectly shaped like Hello Kitty. I was pretty proud of myself, not gonna lie.
The Results
The cake looked amazing, almost too cute to eat. But, of course, we had to try it. I sliced it up, and it was fluffy and moist, just like I wanted. It tasted as good as it looked, maybe even better. My friends and family loved it, and it was a hit at our little get-together.
- Mix Wet Ingredients Well: Cream that butter and sugar until it’s fluffy. It makes a big difference.
- Don’t Overmix: When adding dry ingredients, mix until just combined. Overmixing is a no-no.
- Silicone Molds Rock: These things are super easy to use and clean. Plus, they release the cake like a dream.
All in all, it was a fun experiment. Baking with the Hello Kitty mold turned out to be a great way to spend an afternoon, and the results were delicious. If you’re looking for a fun and easy baking project, I’d definitely recommend giving this a try. You don’t need to be a pro baker to make something cute and tasty. Trust me, if I can do it, anyone can!
So, that’s my Hello Kitty cake adventure. Hope you enjoyed hearing about it. Until next time, happy baking!


