
Okay, so I decided to give meringue sandwich cookies a shot the other day. Had some egg whites left over from another recipe, didn’t want them to go to waste, you know? Seemed like a good idea at the time.
Getting Started
First thing, I got all my stuff out. You really gotta make sure your bowl and whisk are super clean, like, zero grease. Heard that somewhere and it stuck. So I washed my mixing bowl again, just to be safe. Then I carefully separated a few more eggs because you always need more than you think, right? Got the sugar measured out, grabbed the vanilla, a bit of cream of tartar – supposed to help stabilize things. Laid out my baking sheets with parchment paper.
Whipping the Meringue
Alright, into the mixer went the egg whites and the cream of tartar. Started it slow, let them get foamy. Then, I started adding the sugar, like really slowly, a spoonful at a time while the mixer was running. Watched it change. It went from bubbly foam to this thick, glossy white stuff. Kept it whipping for what felt like forever. You’re looking for those stiff peaks. Lift the whisk and the peak should stand up straight, maybe curl over just a tiny bit at the very tip. Yeah, that took a while but got there eventually. Stirred in a splash of vanilla at the end.
Piping and Baking
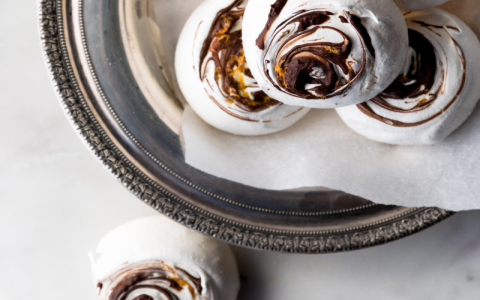
Next up was piping. Filled up a piping bag fitted with a simple round tip. Tried to make small, even circles on the parchment paper. Easier said than done. Some were bigger, some smaller, definitely not bakery perfect, but hey, homemade charm, right? Made sure to leave some space between them.
Then came the baking part, which is more like drying, really. Popped the trays into a really low oven. Like, super low heat. Left them in there for ages, over an hour easily. The idea is to dry them out without browning them much. After the time was up, I turned the oven off and just left the door cracked open, let the meringues cool down completely inside. This part needs patience. I checked one by tapping it – felt dry and hollow, lifted off the paper easily. Good sign.
Filling and Finishing
While the meringues were cooling, I whipped up a quick filling. Nothing fancy, just some basic chocolate buttercream. Melted chocolate, butter, powdered sugar, bit of milk. Mixed it until it was smooth enough.
Once the meringue shells were totally cool – and I mean completely cool, otherwise they get sticky – I started matching them up by size. Put a dollop of the buttercream on the flat side of one shell, then gently pressed another shell on top. Made little sandwiches. Did that for all of them. Had to be gentle, those meringues are delicate little things.
The Result
So, how did they turn out? Pretty decent, actually. Crisp shells, chewy inside just a bit, nice chocolate filling. They weren’t the prettiest things I’ve ever made, shapes were a bit all over the place. But they tasted good. It’s a bit fiddly, gotta be patient with the drying and cooling. But yeah, a successful little baking project. Worth doing if you’ve got the time and some spare egg whites hanging around.


